

How To Rename Dvd Drive In Windows 10
Z7_3054ICK0KGTE30AQO5O3KA30N0
hp-concentra-wrapper-portlet
![]() Actions
Actions
HP PCs - CD/DVD Drive Is Not Detected (Windows 7)
This document applies to HP computers with Windows seven.
When y'all try to burn down or read a disc, goose egg happens or an error stating that the drive cannot be plant appears in the CD/DVD called-for software.
Use ane of the following sections that best describes your situation:
The CD/DVD bulldoze does not appear in Windows 7
If a window does not open when discs are inserted into the drive and the drive does not appear in Windows Explorer, then the bulldoze is not beingness recognized by Windows 7. Use these steps to troubleshoot this status.
annotation:If you have a new notebook reckoner, make sure the computer actually has a CD/DVD bulldoze. Several models of notebook reckoner practice not come up with CD/DVD drives and must use an external USB drive.
note:If you lot have upgraded your computer to Windows seven and the drive was working earlier but is no longer working correctly in Windows 7, you tin save time by starting at Step 5 to remove the upper and lower control filters from the registry.
Step 1: Meet if the drive appears in Windows 7 BIOS
The BIOS in your calculator manages all communication between the hardware components and the operating system. If the operating system does not recognize the CD/DVD drive, check the BIOS and come across if information technology is recognized in that location. To check the BIOS, utilise one of the following sets of steps, depending on the type of computer and the version of BIOS you lot are using:
If you are using a notebook figurer running Windows 7
-
Plough off the estimator and wait five seconds.
-
Turn on the computer and immediately press the F10 key repeatedly until the BIOS Setup Utility screen appears.
If BIOS does non open using F10, repeat the process using the F1 key instead.
-
Utilise the arrow keys to navigate to the Organisation Configuration screen.
-
Select Boot Options and so printing Enter.
-
On the Boot Options sub-screen, select Boot Order and then press Enter.
-
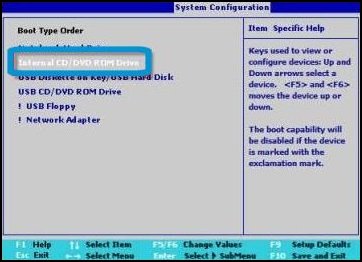
In the Kicking Order listing, look for a CD/DVD drive entry. Depending on your notebook model and specific CD/DVD drive, the entry proper name indicates the verbal type of disc bulldoze you take (for instance, it might read Internal CD/DVD-ROM Drive).
Figure : Example of CD/DVD bulldoze listing in notebook BIOS
-
Press Esc and so printing Enter to Exit BIOS.
If you lot are using a desktop computer with BIOS version vi or less running Windows 7
-
Plough off the reckoner and wait v seconds.
-
Turn on the figurer and immediately press the F10 central repeatedly until the BIOS Setup Utility screen appears.
If BIOS does non open up using F10, repeat the process using the F1 fundamental instead.
-
Use the arrow keys to navigate to the Main tab.
-
Wait for a CD/DVD drive name next to ane of the Aqueduct Device listings.
Figure : Instance of CD/DVD drive list in desktop BIOS version 6 or less

-
Printing Esc and and then press Enter to Exit BIOS.
If you are using a desktop figurer with BIOS version seven or greater running Windows 7
-
Plough off the computer and wait five seconds.
-
Turn on the computer and immediately press the F10 key repeatedly until the BIOS Setup Utility screen appears.
If BIOS does not open using F10, repeat the procedure using the F1 central instead.
-
Use the arrow keys to navigate to the Storage tab.
-
Use the arrow keys to select Device Configuration, and and so press Enter.
-
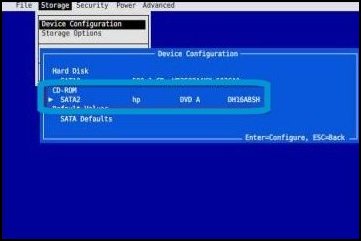
Expect for a CD/DVD bulldoze entry in the Device Configuration sub-screen.
Figure : Example of CD/DVD drive listing in desktop BIOS version seven or greater
-
Printing the Esc primal to exit Device Configuration.
-
Press the Esc central again, press Enter, and and then press Enter again to Ignore Changes and Exit BIOS.
If there is no CD/DVD drive listed in BIOS, the trouble is probably hardware-related. If you are using a desktop computer, continue to Step 4. If you are using a notebook computer, contact HP Customer Support for farther aid.
If a CD/DVD bulldoze proper noun is listed in BIOS, the BIOS recognizes the device and the problem is most likely software-related. Continue to the next stride.
Pace two: Checking the bulldoze name in Device Manager in Windows seven
Use the post-obit steps to reinstall the bulldoze in Device Manager and to detect if Windows is able to recognize the drive.
Evidence me how

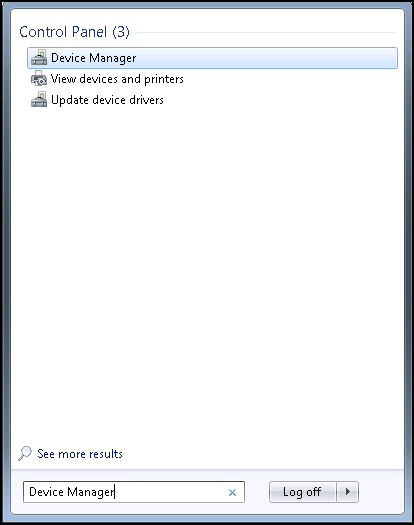
-
Click Start
 , and enter Device Manager into the Search field. Click Device Manager.
Effigy : Opening Device Managing director
-
Double-click DVD/CD-ROM drives.
If DVD/CD-ROM drives is not in the list, skip to Stride three to reset power.
-
Right-click the drive proper noun and select Uninstall.
Figure : Uninstall DVD/CD-ROM drive

If a confirmation window opens, click OK.
The drive proper name should exist removed from the list (and the DVD/CD-ROM drives category will also be removed if in that location is only 1 drive).
-
In Device Manager, click Action, select Scan for hardware changes, and so expect for Windows to observe and install the CD/DVD drive.
Figure : Scan for hardware changes

When the installation finishes, the drive proper noun should appear in Device Manager.
-
Open the DVD/CD-ROM bulldoze category over again and do the post-obit deportment depending on what is shown in DVD/CD-ROM drives:
-
If the CD/DVD drive name is missing, the drive is non beingness detected by Windows. Scan for hardware changes over again to try to detect the bulldoze. If the bulldoze is still not detected, close Device Manager and skip to Step 3 to reset power and reseat the bulldoze cables if necessary.
-
If a drive proper name is shown with an alert icon (the drive icon is marked with an alert symbol,
 ), double-click the drive name to observe more than information. Do the following depending on what is shown in the Device Status department:
If error lawmaking ten, xix, 31, 32, 39 or 41 is shown in Device Status, a problem exists with the integration of previous CD called-for software. Utilize Footstep v to remove associated command filters from the registry.
-
If a drive name is shown with a disabled icon (the drive icon is marked with an arrow pointing down,
 ), the drive has been disabled. Correct-click the drive proper name and select Enable. You lot might have to restart the computer. The drive should work correctly in one case it has been enabled.
note:
If the drive cannot be enabled, a required software service or driver is disabled or not performance properly. Double-click IDE ATA/ATAPI controllers in Device Manager to see if there are any problems and troubleshoot them according to the fault codes.
Resetting the BIOS might likewise resolve this problem:
- To reset the BIOS on a notebook figurer, restart the computer, press F1 or F10 (depending on computer model) repeatedly at startup to open the BIOS Setup Utility, press F9 to Setup Defaults, press Enter, and and then press F1 or F10 over again to Save and Leave.
- To reset the BIOS on a desktop computer with BIOS version half dozen or less, restart the computer, press F1 or F10 (depending on computer model) repeatedly at startup to open the BIOS Setup Utility, press F5, press Enter, and then press F1 or F10 again to Save and Exit.
- To reset the BIOS on a desktop computer with BIOS version vii or greater, restart the computer, press F1 or F10 (depending on computer model) repeatedly at startup to open the BIOS Setup Utility, use the pointer keys to navigate to the File tab, select Utilise Defaults and Get out, and then press Enter.
-
If the CD/DVD drive is listed as normal, with no special icons
 , Windows is detecting the drive simply other software used to burn discs might non be detecting the drive. Use the steps in Software for burning discs does not recognize the drive to make the disc burning software detect the bulldoze.
-
Pace three: Resetting the power on computers running Windows 7
Under sure conditions the bulldoze might lose communication with Windows, even later restarting Windows. To reset the drive, practice the following steps:
-
Select Start
and then Shut down from the power card. -
Wait until the computer fully shuts down then disconnect the power string from the computer.
-
If you accept a notebook computer, remove all batteries from their compartments, wait 10 seconds, and so reinsert the battery (or batteries). If your notebook reckoner has a bombardment that is sealed within the computer's case, a battery that cannot be removed hands, skip this footstep.
-
After waiting at least 10 seconds, reconnect ability to the computer.
-
Turn on the computer and expect for Windows to first. If any letters open stating that Windows is installing new hardware, expect for Windows to end before checking to come across if the CD/DVD drive is bachelor.
If the drive is still missing afterward resetting power, continue to the next footstep.
Stride 4: Checking drive cable connections of computers running Windows 7 (desktop tower computers only)
If you are using a desktop estimator, perform the steps in this section to cheque the CD/DVD drive cabling. If you lot are using a notebook computer, skip to Step five.
warning:The edges of metal panels can cut pare. Be careful not to slide skin along any interior metal edge of the computer.
caution:This product contains components that can be damaged past electrostatic discharge (ESD). To reduce the chance of ESD damage, work over a not-carpeted floor, utilize a static dissipative piece of work surface (such as a conductive foam pad), and wear an ESD wrist strap connected to a grounded surface.
-
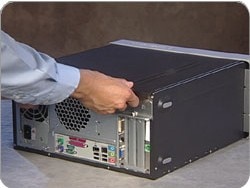
Plow off the estimator, unplug all cords from the computer, and then press the Power button on the front of the computer for five seconds.
-
Remove the side panel.
Figure : Removing the side panel

-
Gently disconnect both the data cable and the power cablevision from the back of the CD/DVD drive.
-
Ability Cable
-
Information Cable
Effigy : Power cable and data cable

-
-
Reinsert the ability and data cables into the dorsum of the drive making sure the cables fit snugly into their connectors and making sure there are no bent pins.
-
Gently remove and reinsert the CD/DVD bulldoze information cable from the connector on the motherboard. Be careful not to dislodge other cables.
-
If the CD/DVD bulldoze is not original equipment and was recently added, make sure that the bulldoze cables are installed correctly.
-
Replace the cover and plug in the ability, keyboard, mouse, and video cables.
Figure : Replacing the side console
-
Check if the drive proper noun appears in BIOS using one of the following sets of steps, depending on your computer'due south version of BIOS.
If your figurer features BIOS version 6 or less, use the following steps to check if the drive name appears in BIOS:
-
Plow on the computer and immediately printing the F10 key repeatedly until the BIOS Setup Utility screen appears.
If BIOS does not open using F10, restart the reckoner and press the F1 fundamental instead.
-
Press F5, and then press the Enter fundamental to reset the BIOS to the defaults. Setup Defaults tin can also be found on the Go out screen of the BIOS Setup Utility.
-
Apply the arrow keys to navigate to the Main tab.
The CD/DVD bulldoze name should appear next to one of the channel listings.
Figure : Example of CD/DVD bulldoze listing in BIOS version half-dozen or less
-
Press F10 (or F1) and then press Enter to Save and Exit.
The computer exits the BIOS and starts into Windows.
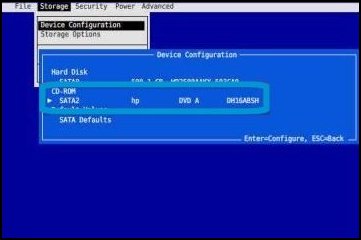
If your computer features BIOS version 7 or greater, use the following steps to check if the drive name appears in BIOS:
-
Turn on the calculator and immediately printing the F10 key repeatedly until the BIOS Setup Utility screen appears.
If BIOS does non open using F10, restart the computer and printing the F1 key instead.
-
Utilise the arrow keys to navigate to the Storage tab.
-
Use the arrow keys to select Device Configuration, so printing Enter.
-
Look for a CD/DVD drive entry in the Device Configuration sub-screen.
Figure : Example of CD/DVD drive list in BIOS version vii or greater
-
Press the Esc key to exit Device Configuration.
-
Printing the Esc key again, press Enter, and then printing Enter again to Ignore Changes and Exit.
The figurer exits the BIOS and starts into Windows.
-
-
Practise i of the following deportment depending on what is listed in the BIOS:
-
If the drive proper name appears, the bulldoze is recognized by the BIOS and should also be recognized past Windows.
-
If Windows recognizes the drive, you are finished.
-
If Windows does not recognize the drive, repeat Step 2 to run into if the drive proper name appears in Device Managing director and troubleshoot disc burning software if needed.
-
-
If the drive proper name still does non appear, replace the cable, the drive, or have the computer serviced.
notation:
If you lot suspect that the drive might be bad after using these steps, examination the drive to see if the hardware has failed.
-
Step v: Clearing the upper and lower registry filters on computers running Windows 7
Clear the registry filters for Device Manager error codes 10, 19, 31, 32, 39 or 41 using the following steps:
-
If you cannot use the Microsoft Set up it Solution, continue using these steps to articulate the upper and lower registry filters manually.
-
Unplug all non-essential external plug and play devices, especially cameras. Then complete the following steps.
Show me how
-
Click Start
, and then enter regedit into the Search field. Click regedit.Effigy : Search for regedit

If yous are prompted for an Ambassador countersign or confirmation, blazon the countersign or provide confirmation.
The Registry Editor opens.
-
Select Calculator in the main window.
Effigy : Registry Editor

-
Click File, click Export, blazon a filename that is easy for you to remember, and then click Save.
A re-create of the registry has been saved for back-up purposes to the Documents binder. If problems occur after using these steps, browse to the file and double-click information technology to restore the registry.
-
Click the arrow next to each of the following items in the list:
- HKEY_LOCAL_MACHINE
- SYSTEM
- CurrentControlSet
- Command
- Grade
-
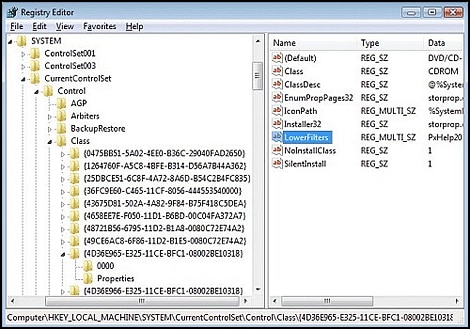
Select 4D36E965-E325-11CE-BFC1-08002BE10318. Brand sure y'all take selected this verbal key name.
-
If a LowerFilters value is listed on the correct side of the registry editor window, select the LowerFilters value and press the Delete central. Ostend the deletion by clicking Yes.
Figure : Registry Editor: LowerFilters key

-
If an UpperFilters value is also listed, select UpperFilters in the correct window and press the Delete primal.
Ostend the deletion by clicking Yeah.
-
Delete all other UpperFilters and LowerFilters values within the 4D36E965-E325-11CE-BFC1-08002BE10318 primal if any exist.
-
Close the Registry Editor and restart the computer. The disc drive should at present be recognized by Windows. Yous might need to uninstall your disc recording software, restart the computer, reinstall the CD/DVD writing software, then restart the computer over again if the software no longer recognizes the drive (see next section).
Pace 6: Testing for drive failure on computers running Windows 7
If y'all doubtable that the drive might exist bad afterwards using the previous steps, exam the drive to see if the hardware has failed. If the drive test fails, the drive needs to be replaced or the computer needs to be serviced.
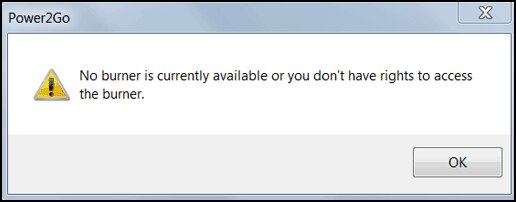
Software for burning discs does not recognize the bulldoze in Windows vii
If the CD/DVD writing software displays notification that no drive is detected, employ the steps in this section.
note:Disc recording software programs that come with HP and Compaq computers are made to recognize only the original CD/DVD drives that come with the calculator. If you accept added a new drive, use the disc burning software that came with the drive or utilize the native burning capabilities of Windows 7.
Figure : CyberLink Power2Go error message example
Stride 1: Using the Hardware and Devices troubleshooter in Windows vii
Windows vii includes a troubleshooter that checks hardware, such as CD/DVD drives, for bug. Follow these steps to use the Hardware and Devices troubleshooter to check for problems:
-
Click First
, and so click Control Console. -
Under System and Security, click Find and fix problems.
Effigy : System and Security section of Command Panel

-
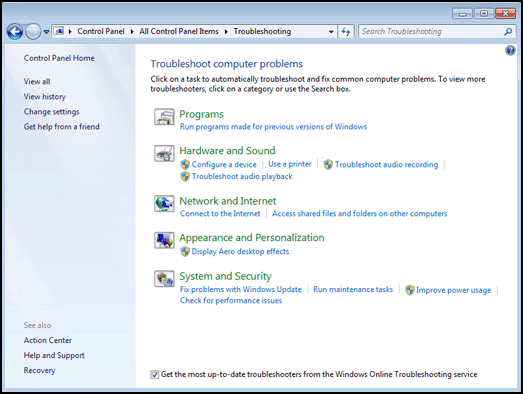
Under Hardware and Sound, click Configure a device.
Figure : Troubleshooting computer bug
If you are prompted for an Administrator password or confirmation, type the password or provide confirmation.
-
Click Next.
-
Windows checks for problems. If the troubleshooter detects issues, follow the instructions to fix the problem.
If the drive is still missing later using the troubleshooter, proceed to the next step.
Step 2: Reinstalling disc recording software in Windows 7
Upgrading the operating organization or installing certain types of software can cause other recording software to lose their connection to the drive. Installing software that can burn down discs, some music software, and some DVD authoring/decryption software can cause these types of problems.
To correct the problem and permit the software to detect the drive again, uninstall the CD/DVD recording software, restart the figurer, reinstall the disc recording software, so restart the computer again.
annotation:If the CD/DVD writing software that you lot utilize was purchased separately, uninstall the software, restart, then use its installation discs to install the software, so restart again.
The post-obit procedure is an instance of how to correct a No burner is currently available bulletin in CyberLink Power2Go.
annotation:Those familiar with editing the Windows registry can save time by calculation a LowerFilters value to the Windows Registry instead of reinstalling the software. To practice so, skip to Footstep iii.
-
Uninstall CyberLink Power2Go from Programs and Features:
-
Click Start
, and then click Control Panel. -
Under Programs, click Uninstall a plan.
The Uninstall or change a program window opens.
Figure : Uninstall or modify a program

-
Select Power2Go, and click Uninstall/Alter from the menu bar.
-
Follow the instructions to uninstall Power2Go.
-
-
Afterwards CyberLink Power2Go has been uninstalled, restart the computer.
-
Afterward the computer has restarted, install CyberLink Power2Go from the HP Application Recovery plan:
-
Click Get-go
, click All Programs, click Recovery Manager, and then click Recovery Manager again.Figure : Recovery Manager

-
Click Software Plan Reinstallation.
-
On the Software Program Reinstallation welcome screen, click Next.
-
Select CyberLink Power2Go, and and so click Side by side.
Figure : Select program to reinstall

-
Follow the on-screen instructions to reinstall CyberLink Power2Go.
-
-
Open CyberLink Power2Go and verify that a drive name appears as the destination option.
Afterwards the CD/DVD software is reinstalled and the computer has been restarted, it should recognize the CD/DVD drive. If the drive is not recognized, continue to the next step.
Step 3: Replacing the PxHelp20 registry value on computers running Windows 7
Use the following steps to replace the PxHelp20 registry value:
-
Unplug all non-essential external plug and play devices, especially cameras. And so complete the following steps.
Show me how
-
Click Start
, and then enter regedit into the Search field. Click regedit.If you are prompted for an Ambassador password or confirmation, blazon the password or provide confirmation.
-
Select Computer in the main window.
-
Click File, click Consign, blazon a filename that is easy for y'all to remember, and then click Salvage.
A re-create of the registry has saved for dorsum-up purposes to the Documents binder. If problems occur after using these steps, browse to the file and double-click it to restore the registry.
-
Click the arrow next to each of the post-obit items in the list:
- HKEY_LOCAL_MACHINE
- Organisation
- CurrentControlSet
- Control
- Grade
-
Select 4D36E965-E325-11CE-BFC1-08002BE10318. Make sure you have selected this exact key proper name.
-
If a LowerFilters value is listed on the right side of the registry editor window, click the LowerFilters value, and printing the Delete key. Confirm the deletion by clicking Yes.
-
With the 4D36E965-E325-11CE-BFC1-08002BE10318 key even so selected, right-click whatsoever bare area of the right side of the registry editor window (the window pane list all the values inside the key).
-
Select New and Multi-String Value.
Figure : New Multi-String Value

-
Supercede the default text for the new value past typing the following and then pressing Enter:
LowerFilters
-
Right-click the new LowerFilters value and select alter.
-
Blazon the post-obit into the Value Data field:
PxHelp20
-
Click OK.
A new LowerFilters value containing Data PxHelp20 is listed in the Registry Editor window.
Figure : Registry Editor: LowerFilters key
-
Close the registry editor and restart the figurer. The disc drive should now exist recognized by your recording software. If not, keep to the next step.
Step 4: Getting the latest drive firmware updates from the Web for computers running Windows 7
Go to the HP Web site to see if there are any drive firmware and/or recording software updates bachelor. Apply the following steps:
-
In the Search box, enter your product name/number (for example, Pavilion FM475EA or HP Pavilion dv71020eo), and then click Find my production.
-
Select the version of Windows the calculator is using.
-
Click the Firmware link and wait for any available CD/DVD firmware updates, for example HLDS CH10L DVD-R/RW drive firmware update. Then click the Software - Multimedia, and Software - Solutions links and await for whatever available recording software updates, for case CyberLink Power2Go update.
-
If there are updates available for the CD/DVD drive or recording software, select the ones that utilize.
-
Follow the instructions on the download pages to download each applicable update.
-
Install the updates co-ordinate to the instructions on the download page.
One time you have installed the updates or if no updates were bachelor, continue to the next step.
Footstep five: Restoring system files in Windows 7
Apply Microsoft Organization Restore to return the system dorsum to a time when the CD/DVD writing software was known to work. For more data, refer to the "Restoring Windows to a Previous Point" department of the HP support certificate Using Microsoft System Restore (Windows vii).
If a System Restore does not resolve the problem, you lot can use Recovery Managing director to return the computer software configuration back to its original land. For more information, refer to the HP support certificate Performing an HP System Recovery (Windows 7).
Pace vi: Testing for bulldoze failure on computers running Windows 7
If y'all doubtable that the bulldoze might be bad after using the previous steps, test the drive to run into if the hardware has failed. If the bulldoze test fails, the drive needs to exist replaced or the computer needs to be serviced.
Source: https://support.hp.com/id-en/document/c01895589
Posted by: stewarttorcer.blogspot.com
0 Response to "How To Rename Dvd Drive In Windows 10"
Post a Comment